I pulled the following from a DIY website, which describes the many components to a typical aluminum gutter system that may be used around your home. Regardless of how it is setup, how it looks, or the material of the system, it's primary purpose is to keep water away from your home.

When we first moved in, we realized after the first few rain showers, that water was spilling over the edges of the gutters in multiple different locations around the house. After inspecting the gutters, I realized that they were filled with leaves and silt so water was not able to make it to the drop outlet to drain away from my house.
I gathered the following items: a ladder, heavy duty gloves, garbage bag and my garden hose with an affixed pistol grip spout. I'm not going to glorify this task, it's not fun nor is it an interesting project. Add on to the start of winter, cold weather in a wet working environment did not make for a good combination, so if you can, check your gutters when the climate is to your advantage.
Thus the project begins, start digging into gutter and remove all the excess leaves and silt that has accumulated since it's last cleaning, if ever, and place into the garbage bag. I ended up tying one end of the garbage bag to one of the higher rungs of the ladder so I have one hand to hold onto the structure while the free hand was pulling the obstruction out of the gutter.
Once I was able to remove most of the obstruction, I took the garden hose and adjusted the nozzle so that I would expel a high velocity of water. I started from the opposite end of the gutter or close to an end cap furthest from where the downspout is located and sprayed the remainder of the loose dirt out. You may need to bring back the garbage bag to pull more loose dirt once it starts accumulating again. For parts of the gutter that had two downspouts on either end, I would start in the middle or where it seemed to be the lowest point in between either drop outlet.

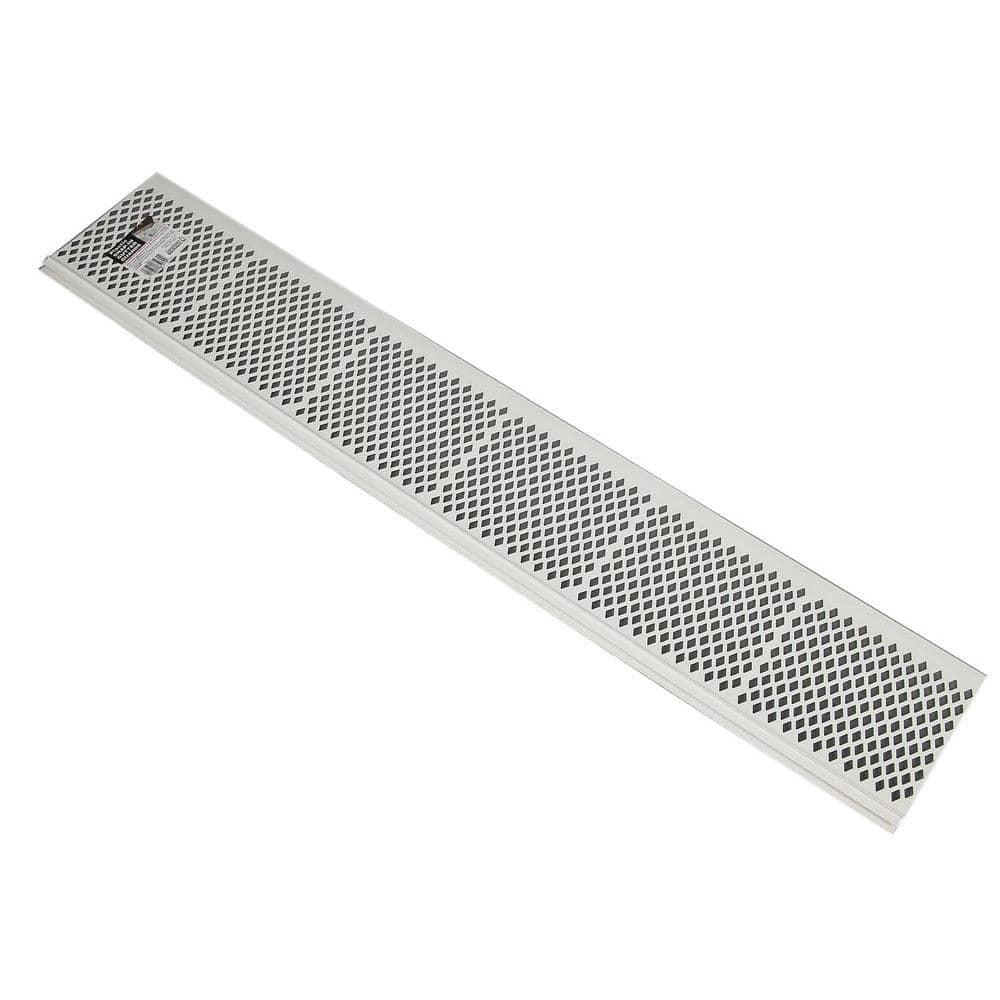
In the middle of this project, I realized that it is something I do not want to do again, or at least I would need to find a way to prolong having to do this again. I went to the local Home Improvement store and purchased snap-on Gutter Guards; they come in multiple types and colors that are available. I prefer the ones that are depicted below; they appear to far more durable and simpler to attach. They are a couple dollars per 3 feet segments. They do come in cartons, which also helps in saving a few extra dollars. These guards have an embedded mesh wiring in-between the plastic body which allows water to filter through while keeping debris out of the gutter system.
 | |
|
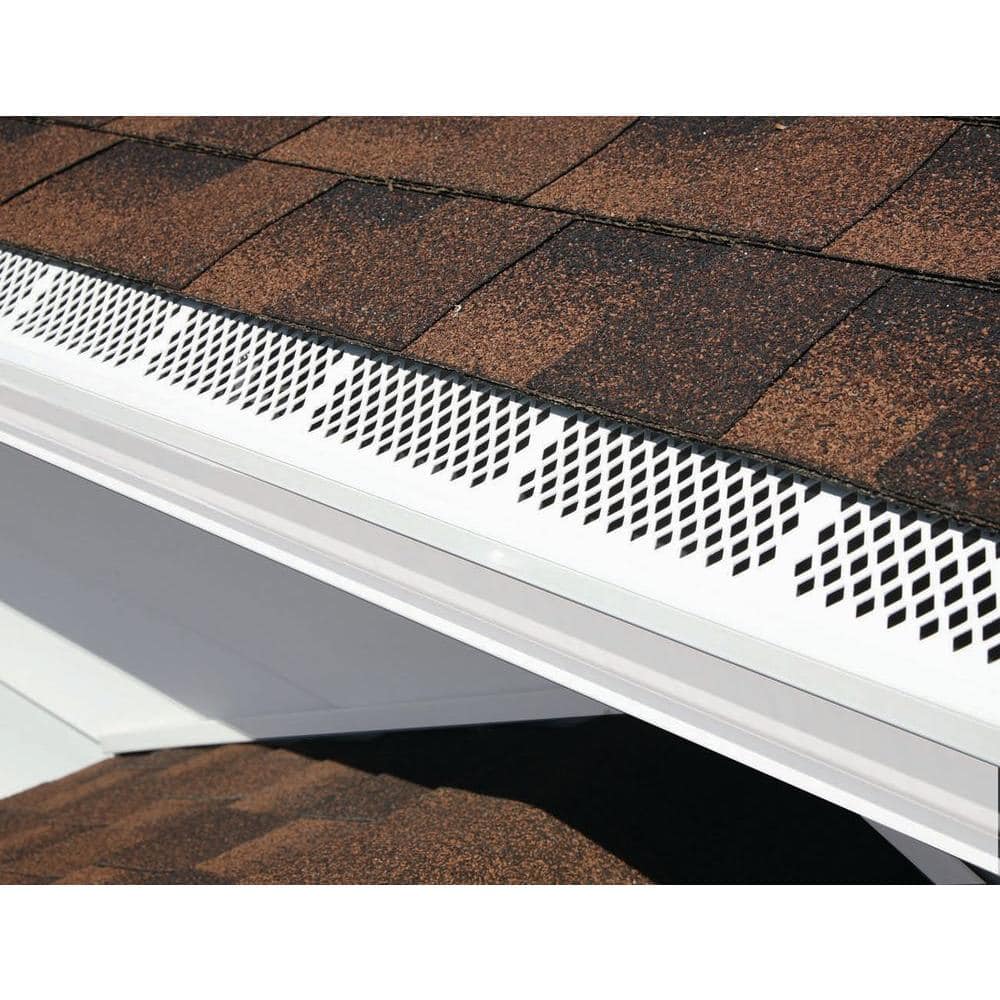 |
| Image pulled from Home Depot Website, depicting Amerimax 3ft Snap-in Gutter Guard |


Thanks very much for your detailed tips on cleaning the gutters! Keeping them clog-free is definitely very important. If the downspouts get clogged, the gutters could fill with water until they seep into the house and cause quite a bit of damage. Heaven knows water damage is hard to repair! I'm quite busy myself with work, so I hire a professional service to do the cleaning for me once to twice a month.
ReplyDeleteMost of the time, downspouts get clogged if you have tree hanging over on the rain gutters because of all the leaves and twigs. I usually hire some professional to do it for me at least once a month, especially during summer and fall.
ReplyDeleteIt’s true that gutters are made to protect your home from water or snow, but it's also important to clean and maintain it. Knowing how to protect them can have you reassured that they would last.
ReplyDeleteChelsea @GutterHelmet.com
Protect your home from clogged gutters with Gutter Guards. Our expert team provides professional installation.
ReplyDeletegutter cleaning roswell
Thank you for this invaluable guide on cleaning rain gutters! Your detailed instructions made what seemed like a daunting task much more manageable. To explore more about gutters cleaning visit ProInTheCity Gutter Cleaners directory.
ReplyDeleteRain water must be adequately transported from the top of your structure, which necessitates the installation of a well-designed gutter cleaning in brooklyn system. Gutter and leader systems must be specifically built to manage various forms of precipitation, mud, and debris to fulfill the anticipated demand. That’s why nothing beats a custom seamless gutter system when it comes to design and engineering.
ReplyDeletehi
ReplyDeleteIf you guys are searching for Abbotsford Top Rated Gutter Cleaning Company just visit to my website. Pressure washing is maintaining your property appearance and health. In Abbotsford, BC, we So clean Home Services provide best pressure washing service. We not only care you but also care your property.
ReplyDeleteThis comment has been removed by the author.
ReplyDeleteCleaning gutters is crucial for home maintenance, and I learned this lesson the hard way when I moved into my new house. In my excitement, I neglected to check the gutters, and after just a month of heavy rain, I was shocked to see water pouring over the sides. I quickly climbed up to investigate, only to find that the gutters were completely clogged with leaves and debris. Realizing I needed help, I turned to the google to find a local gutter cleaning service and hire https://gouttieressaintjerome.ca/ to clean, they did an amazing job clearing out the mess. Not only did they clean the gutters thoroughly, but they also provided me with valuable tips on how to maintain them moving forward.
ReplyDeleteThat experience opened my eyes to just how vital clean gutters are for protecting my home. I’m grateful I found a reliable service to help me, and I won’t be neglecting my gutters again!
When it comes to home maintenance, keeping your roof in good condition is crucial, and one often overlooked aspect is the importance of rain gutter cleaning. Clogged gutters can lead to water backing up and damaging your roof, leading to leaks and more extensive repairs down the line.
ReplyDeleteRegular rain gutter cleaning service helps prevent debris accumulation, ensuring water flows freely away from your home. This proactive measure protects not only your roof but also your foundation and landscaping. Neglecting your gutters can result in costly repairs, so scheduling a professional service can save you time and money in the long run.
Make it a habit to check your gutters at least twice a year, especially after heavy storms or falling leaves, to maintain your roof's health and prolong its lifespan.
Great post! Cleaning rain water gutters is such an essential task for maintaining a home's structure and preventing water damage. Your tips are straightforward and easy to follow, especially for someone like me who's just starting to take better care of their property. Regular maintenance of rain water gutter not only protects the house but also saves a lot of money in the long run. Thanks for sharing these valuable insights!
ReplyDeleteNice post visit us Gutter cleaning services in Delta
ReplyDeleteGutter cleaners perth do an amazing job keeping homes safe from water damage, especially with all the leaves and debris that build up over time.
ReplyDeleteSeamless gutters really improved our home. Edmond Gutters
ReplyDeleteGutters are one of those things that get ignored until there's a problem. If you’re looking to avoid that issue, definitely check out this expert gutter installation in NJ to keep everything in top shape. You can also find reliable gutter installation in NJ if you want to prevent any future issues. Another great option is this quality service, or you could visit this reliable service in NJ to get it done. Don’t forget to check this expert team for some of the best results in the area.
ReplyDeleteExcellent post! Regular gutter cleaning is essential to prevent water damage and roof problems. At New Vision Gutters,, we always emphasize the importance of proper maintenance. Thanks for sharing these helpful tips!
ReplyDeleteNice write-up! Your step-by-step walkthrough on gutter cleaning makes a big job feel manageable. At Discount Gutters, we appreciate how you highlight the importance of “remove the debris + check the finish” — setup like this really keeps homes safe and dry. Thanks for sharing!
ReplyDeleteI'm glad you found a solution for keeping your gutters clean.
ReplyDeleteExcellent work repairing our damaged plumbing. Repipe Plumber
ReplyDeleteThis comment has been removed by the author.
ReplyDeleteYour experience really captures what gutter cleaning is actually like messy, tiring, but completely necessary. I like how you kept it simple with basic tools and honest observations. It’s a good reminder that even small home maintenance tasks can prevent bigger issues later. Reading this makes me feel motivated to check my own gutters soon!
ReplyDelete